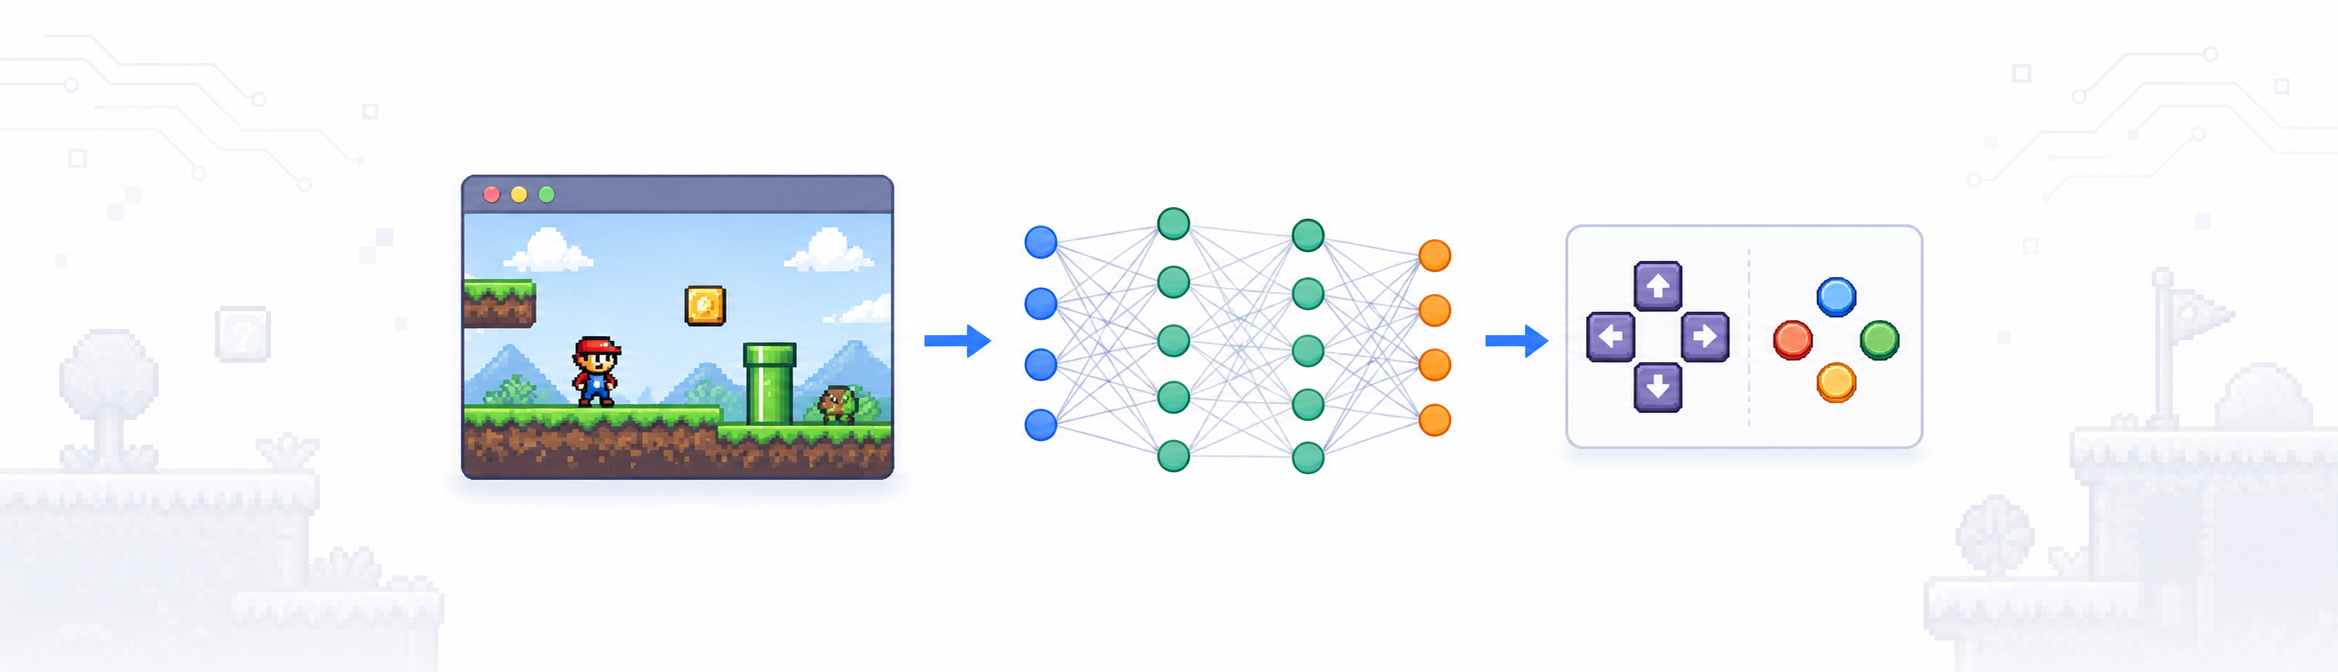
In Part 2 we turned the simple HUD script into a training loop: save state, run an episode, measure progress, and reset. For the neural network to work, we need to give it some “sensor” input. We need a compact, readable view of the level around Mario so the network can decide what to press.
When we play Super Mario, we’re looking at the screen and deciding which buttons to press based on what we see. For this project, instead of visually processing the image on the screen, we’ll build a 13×13 sensor grid centered on Mario. Each cell in the grid represents a 16×16-pixel tile as one of three values: wall or floor (1), enemy (-1), or empty (0).
By the end of this post your script will use the episode loop from Part 2, but it will also:
- Read nearby solid tiles from SMW’s Map16 data
- Read active sprites and map enemies into the same local grid
- Return a 169-element input vector from
buildSensorGrid() - Draw that grid during each episode so you can verify and see what the neural net will “see”
That’s a lot. Here’s what it looks like:
 The overlay should settle into a stable local view of the world around Mario before we feed it into the network.
Starting point
We’re building on the complete script from Part 2. Open the same smw_ai.lua file and keep extending it.
If your script still ends with this test harness, you’re in the right place:
local avgFit = evaluateStrategy(sprintRight, 3)
print(string.format("Average fitness: %.1f pixels", avgFit))
We’ll replace that bottom test harness temporarily to preview the grid, then restore it so the final script stays aligned with the series.
Step 0: Move the HUD to the bottom
First, we’ll get the HUD out of our prime real estate and put hide it at the bottom of the screen. Replace DrawHud with this method:
local function drawHud(st, frame, maxX, startX, stuckFrames)
local screenWidth = client.bufferwidth()
local screenHeight = client.bufferheight()
local hudHeight = 25
local hudY = screenHeight - hudHeight
local bg = 0xCC000000
local fontSize = 9
gui.drawBox(0, hudY, screenWidth - 1, screenHeight - 1, 0x00000000, bg)
local line1 = string.format("X:%d Y:%d Cam:%d Vel:%d Pwr:%d", st.marioX, st.marioY, st.cameraX, st.xVelocity, st.powerUpState)
local line2 = string.format("Frame:%d/%d Max:%d Fit:%d Stuck:%d %s", frame, MAX_FRAMES, maxX, maxX - startX, stuckFrames, st.isDead and "DEAD" or "ALIVE")
gui.drawText(2, hudY + 1, line1, "white", 0x00000000, fontSize, "Arial", "bold")
gui.drawText(2, hudY + 12, line2, st.isDead and "red" or "lime", 0x00000000, fontSize, "Arial", "bold")
end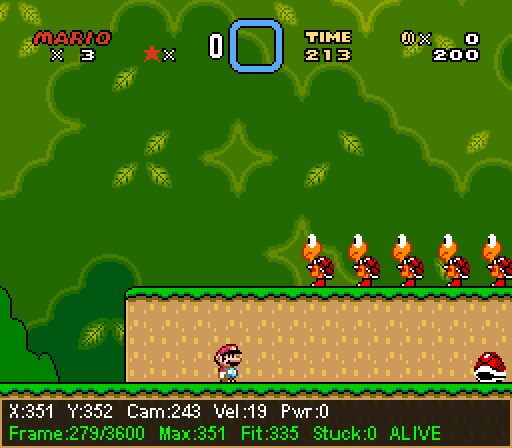 Much nicer; the hud is now a status bar.
Step 1: Add the grid constants
We need a few constants for the grid math and overlay rendering. Add these at the top of the script with the other constants so the rest of the helpers can use them without re-declaring values.
local CP        = 16         -- cell size in world pixels
local GS        = 13         -- grid is 13x13 cells
local CELL      = 8          -- overlay pixels per sensor cell
local CENTER    = math.ceil(GS / 2)
local M16_BASE  = 0x1C800
Step 2: Draw the grid as an overlay
Before we load any game data into the grid, let’s draw the sensor grid with fake data. The overlay renderer is the fastest way to confirm the math is aligned with what you actually see on screen before we start wiring in tile and sprite data.
First, we’ll generate a tiny sample 169-value array by hand and then render that data into the same 13×13 overlay shape we plan to use later with the real game state.
Add this below drawHud:
local function buildSampleInputs()
    local inputs = {}

    for i = 1, GS * GS do
        inputs[i] = 0
    end

    -- Give the sample a few walls and one enemy.
    for c = 1, GS do
        inputs[(1 - 1) * GS + c] = 1
        inputs[(GS - 1) * GS + c] = 1
    end

    for r = 1, GS do
        inputs[(r - 1) * GS + 1] = 1
        inputs[(r - 1) * GS + GS] = 1
    end

    inputs[(CENTER - 1) * GS + CENTER + 3] = -1
    inputs[(CENTER - 1) * GS + CENTER] = 0

    return inputs
end

local function drawSensorGrid(inputs)
    local ox, oy = 00, 00

    for r = 1, GS do
        for c = 1, GS do
            local value = inputs[(r - 1) * GS + c]
            local x1    = ox + (c - 1) * CELL
            local y1    = oy + (r - 1) * CELL
            local x2    = x1 + CELL - 1
            local y2    = y1 + CELL - 1

            local fill
            if value == 1 then
                fill = 0xFF607d8b
            elseif value == -1 then
                fill = 0xFFc0392b
            else
                fill = 0x44c8dff5
            end

            gui.drawBox(x1, y1, x2, y2, 0x88000000, fill)
        end
    end

    local mc = ox + (CENTER - 1) * CELL
    local mr = oy + (CENTER - 1) * CELL
    gui.drawBox(mc, mr, mc + CELL - 1, mr + CELL - 1, 0xFFf39c12, 0xFFf39c12)
end
Inside runEpisode, add two lines to build the sample input and then draw it on the screen.
        [...]
        drawHud(st, frame, maxX, startX, stuckFrames)

        local sampleInputs = buildSampleInputs()
        drawSensorGrid(sampleInputs)

        emu.frameadvance()
        [...]
Of course, the data is not correct - it’s just sample data after all - but now we are visualizing a grid of sensors. I often prefer to create the visual feedback first, so I have something to look at when I’m debugging the more complicated code.
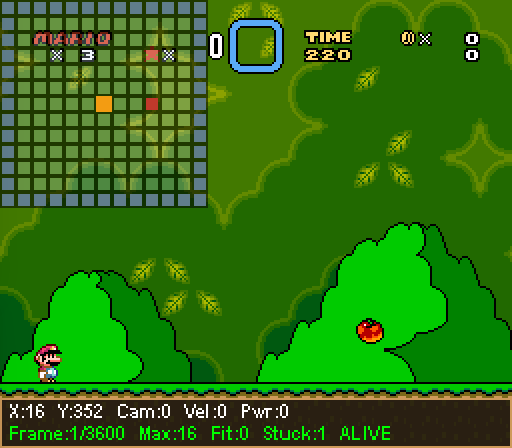 We now have a grid showing sampple data. Mario is the orange box, the red box is a fake enemy, the blue border represents fake walls.
This grid represents the data that we will eventually pass into the neural net. It’s a critical part of this simulation: the input data is the only information available to the neural net for evaluating what actions to take.
Step 3: Build the 13×13 input grid
Now we can convert nearby tiles and sprites into the actual neural-network input vector. This is the core function Part 4 will consume, so it needs to be stable and predictable before we wire it into the network.
Add this below drawSensorGrid:
local function buildSensorGrid()
    local mx      = memory.read_s16_le(0x94, "WRAM")
    local my      = memory.read_s16_le(0x96, "WRAM")
    local sprites = readSprites()
    local inputs  = {}

    for r = 1, GS do
        for c = 1, GS do
            local dy   = (r - CENTER) * CP
            local dx   = (c - CENTER) * CP
            local pixX = mx + dx
            local pixY = my + dy

            local tx = math.floor((mx + dx + 8) / CP)
            local ty = math.floor((my + dy) / CP) + 1

            local value = 0

            if getSMWTile(tx, ty) ~= 0 and pixY < 0x1B0 then
                value = 1
            end

            for _, sp in ipairs(sprites) do
                if math.abs(sp.x - pixX) <= 8
                and math.floor(sp.y / CP) == ty then
                    value = -1
                    break
                end
            end

            table.insert(inputs, value)
        end
    end

    -- Mario occupies the center cell, so don't feed his own body back in as terrain.
    inputs[(CENTER - 1) * GS + CENTER] = 0

    return inputs
end
Two details matter here:
- We use
+8in the X formula so each cell samples from its center, not from the left edge. - We use
+1in the tile Y formula because Mario’s Y position is anchored near his head. That shifts the grid down so the center row lines up with the floor he’s standing on.
Sprites do not use that +1. A Koopa standing on the floor should appear in the row above the floor tile, not inside it.
The pixY < 0x1B0 check filters out the kill plane at the bottom of the level. Without it, the bottom row of every level reads as solid ground, and the network would learn from the wrong signal.
Step 4: Add a Map16 tile reader
The grid needs to know which nearby tiles are solid. Super Mario World stores collision tiles in WRAM starting at 0x1C800. Each byte is one 16×16 tile, so we can sample the local world without having to parse the entire level map.
Add this helper below buildSensorGrid:
local function getSMWTile(tx, ty)
    if ty < 0 or ty >= 27 or tx < 0 then return 0 end

    local idx = M16_BASE + math.floor(tx / 16) * 432 + ty * 16 + (tx % 16)
    if idx >= 0x1FFFF then return 0 end

    return memory.read_u8(idx, "WRAM")
end
The key detail is the address formula:
Tile at (tx, ty) = base + floor(tx / 16) * 432 + ty * 16 + (tx % 16)That 432 jump is not a typo. SMW stores Map16 data in 16-tile-wide column blocks, so each block advances by 432 bytes instead of a simple row-by-row stride.
Step 5: Read active sprites
Tiles tell us about walls and floors. Enemies are separate sprite objects, so we need a second helper for them. This keeps enemy detection separate from terrain detection, which makes the grid easier to reason about.
Add this below getSMWTile:
local function readSprites()
    local sprites = {}

    for s = 0, 11 do
        local status = memory.read_u8(0x14C8 + s, "WRAM")
        if status ~= 0 then
            local x = memory.read_u8(0xE4   + s, "WRAM")
                    + memory.read_u8(0x14E0 + s, "WRAM") * 256
            local y = memory.read_u8(0xD8   + s, "WRAM")
                    + memory.read_u8(0x14D4 + s, "WRAM") * 256

            table.insert(sprites, {x = x, y = y})
        end
    end

    return sprites
end
SMW has 12 sprite slots. We only keep the active ones, then store their world-space X and Y positions so the grid can compare them against each cell.
Step 6: Preview the grid with manual control
Before we wire this into the training loop, use a temporary preview loop so you can walk Mario around and confirm the grid matches what is on screen. This is a fast sanity check that the tile math and sprite math agree with the visible world.
At the bottom of the file, replace the Part 2 test harness with this temporary loop:
- local avgFit = evaluateStrategy(sprintRight, 3)
- print(string.format("Average fitness: %.1f pixels", avgFit))
+ while true do
+     gui.clearGraphics()
+     gui.cleartext()
+
+     local st = readState()
+     drawHud(st, 0, 0, 0, 0)
+     drawSensorGrid(buildSensorGrid())
+
+     emu.frameadvance()
+ end
Save the file, click Refresh in BizHawk’s Lua Console, and move Mario around manually.
You should see:
- floor tiles below Mario as blue cells
- empty air above him as clear cells
- walls appearing in front of him as he approaches them
- red cells when an enemy enters the 13×13 area
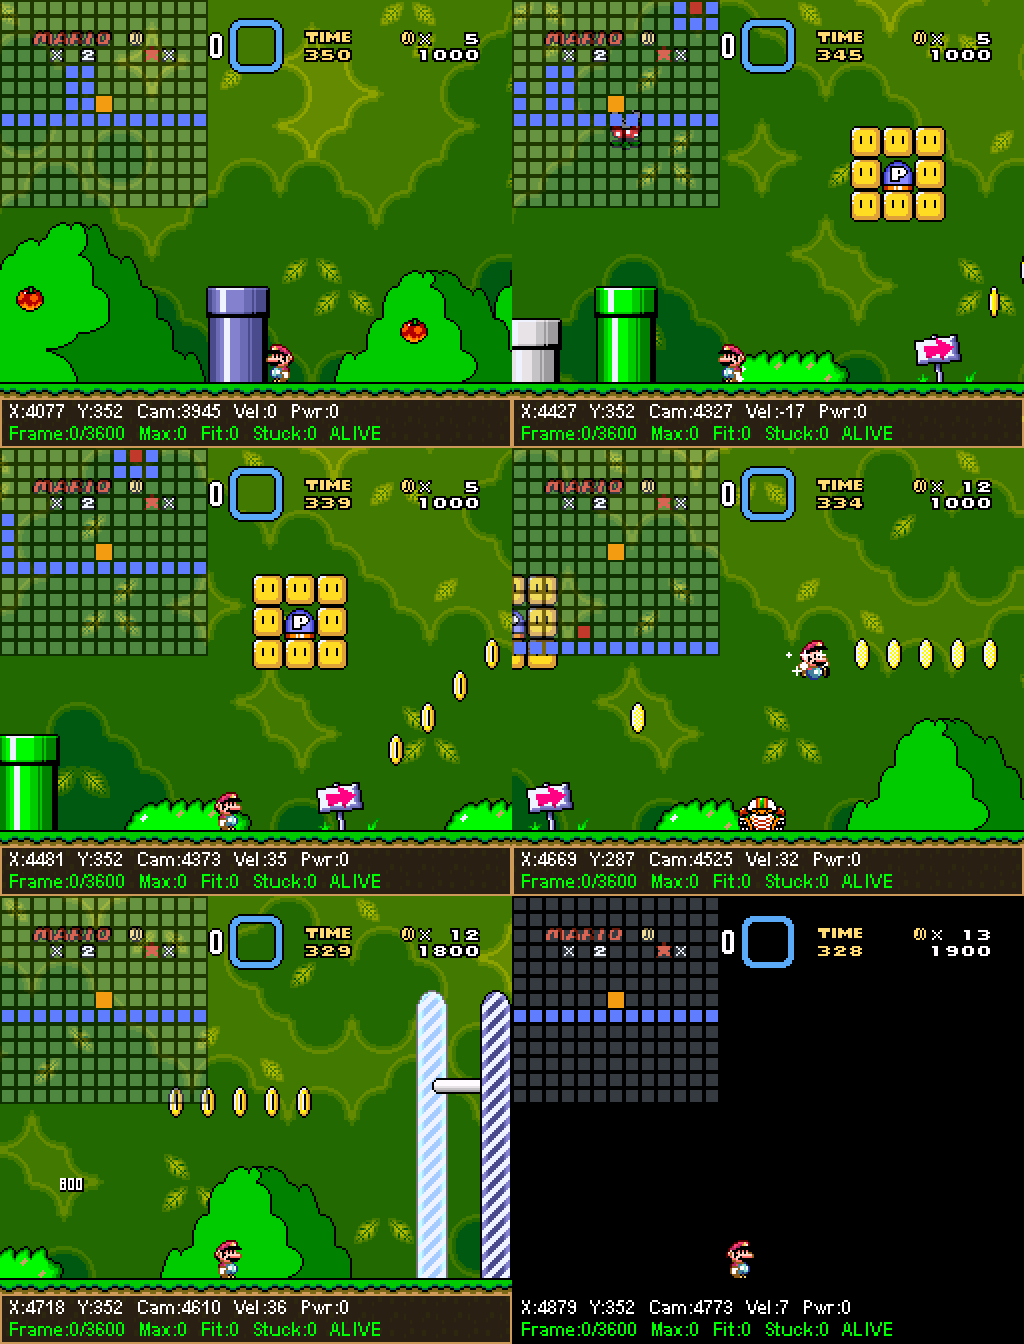 Now under the player’s control, as Mario moves, the sensor grid updates to show the scene.
Step 7: Restore the episode loop and draw the grid during runs
The manual preview was only for inspection. The final script for this post needs to keep the Part 2 episode loop intact so Part 4 can build on it without breaking the training flow.
First, update runEpisode so it draws the grid every frame. Replace the method with this:
local function runEpisode(buttonsFn)
    loadStart()

    local startX      = readState().marioX
    local maxX        = startX
    local stuckFrames = 0
    local deathFrames = 0

    for frame = 1, MAX_FRAMES do
        local st = readState()

        if st.marioX > maxX then
            maxX = st.marioX
            stuckFrames = 0
        else
            stuckFrames = stuckFrames + 1
        end

        if st.isDead then
            deathFrames = deathFrames + 1
            if deathFrames >= 3 then break end
        else
            deathFrames = 0
        end

        if stuckFrames >= STUCK_TIMEOUT then break end

        local buttons = buttonsFn(st)
        joypad.set(buttons, 1)

        drawHud(st, frame, maxX, startX, stuckFrames)

    	local sampleInputs = buildSensorGrid()
    	drawSensorGrid(sampleInputs)

        emu.frameadvance()
    end

    return maxX - startX
end
Then remove the temporary preview loop and restore the Part 2 test harness at the bottom. This brings the script back to the normal training entry point while keeping the sensor grid available during each episode.
- while true do
-     gui.clearGraphics()
-     gui.cleartext()
-
-     local st = readState()
-     drawHud(st)
-     drawSensorGrid(buildSensorGrid())
-
-     emu.frameadvance()
- end
+ local avgFit = evaluateStrategy(sprintRight, 3)
+ print(string.format("Average fitness: %.1f pixels", avgFit))
Save and refresh again. Mario should walk right three times like he did in Part 2, and now the sensor grid should update during each run.
Complete Script for Part 3
You can remove buildSampleInputs, as it was a temporary placeholder. This is the full cumulative script after Part 3. It should be the exact script you keep extending in Part 4:
-- smw_ai.lua  -  Part 3: episode loop + sensor grid
print("script started")

local START_STATE   = (os.getenv("USERPROFILE") or "C:/Users/Default") .. "/Documents/BizHawk/smw_start.state"
-- If BizHawk still cannot find the file, replace the line above with a full path you control using your Windows profile folder.
local MAX_FRAMES    = 60 * 60 -- 60 seconds at 60fps
local STUCK_TIMEOUT = 60 * 5 -- give up if no forward progress for 5 seconds

local CP       = 16 -- cell size in world pixels
local GS       = 13 -- grid is 13x13 cells
local CELL     = 8 -- overlay pixels per sensor cell
local CENTER   = math.ceil(GS / 2)
local M16_BASE = 0x1C800

function saveStart()
    print("Using save state: " .. START_STATE)

    local ok, err = pcall(function()
        savestate.save(START_STATE)
    end)

    if ok then
        print("Saved start state.")
    else
        print("Save failed: " .. tostring(err))
    end
end

function loadStart()
    print("Loading save state: " .. START_STATE)

    local ok, err = pcall(function()
        savestate.load(START_STATE)
    end)

    if not ok then
        error("Could not load start state. Run saveStart() first. " .. tostring(err))
    end
end

local function readState()
    return {
        marioX       = memory.read_s16_le(0x94, "WRAM"),
        marioY       = memory.read_s16_le(0x96, "WRAM"),
        isDead       = memory.read_u8(0x71,    "WRAM") == 0x09,
        xVelocity    = memory.read_s8(0x7B,    "WRAM"),
        cameraX      = memory.read_s16_le(0x1A, "WRAM"),
        powerUpState = memory.read_u8(0x19,    "WRAM"),
    }
end

local function drawHud(st, frame, maxX, startX, stuckFrames)
    local screenWidth = client.bufferwidth()
    local screenHeight = client.bufferheight()
    local hudHeight = 25
    local hudY = screenHeight - hudHeight
    local bg = 0xCC000000
    local fontSize = 9

    gui.drawBox(0, hudY, screenWidth - 1, screenHeight - 1, 0x00000000, bg)

    local line1 = string.format("X:%d  Y:%d  Cam:%d  Vel:%d  Pwr:%d", st.marioX, st.marioY, st.cameraX, st.xVelocity, st.powerUpState)
    local line2 = string.format("Frame:%d/%d  Max:%d  Fit:%d  Stuck:%d  %s", frame, MAX_FRAMES, maxX, maxX - startX, stuckFrames, st.isDead and "DEAD" or "ALIVE")

    gui.drawText(2, hudY + 1, line1, "white", 0x00000000, fontSize, "Arial", "bold")
    gui.drawText(2, hudY + 12, line2, st.isDead and "red" or "lime", 0x00000000, fontSize, "Arial", "bold")
end

local function getSMWTile(tx, ty)
    if ty < 0 or ty >= 27 or tx < 0 then return 0 end

    local idx = M16_BASE + math.floor(tx / 16) * 432 + ty * 16 + (tx % 16)
    if idx >= 0x1FFFF then return 0 end

    return memory.read_u8(idx, "WRAM")
end

local function readSprites()
    local sprites = {}

    for s = 0, 11 do
        local status = memory.read_u8(0x14C8 + s, "WRAM")
        if status ~= 0 then
            local x = memory.read_u8(0xE4   + s, "WRAM")
                    + memory.read_u8(0x14E0 + s, "WRAM") * 256
            local y = memory.read_u8(0xD8   + s, "WRAM")
                    + memory.read_u8(0x14D4 + s, "WRAM") * 256

            table.insert(sprites, {x = x, y = y})
        end
    end

    return sprites
end

local function buildSensorGrid()
    local mx      = memory.read_s16_le(0x94, "WRAM")
    local my      = memory.read_s16_le(0x96, "WRAM")
    local sprites = readSprites()
    local inputs  = {}

    for r = 1, GS do
        for c = 1, GS do
            local dy   = (r - CENTER) * CP
            local dx   = (c - CENTER) * CP
            local pixX = mx + dx
            local pixY = my + dy

            local tx = math.floor((mx + dx + 8) / CP)
            local ty = math.floor((my + dy) / CP) + 1

            local value = 0

            if getSMWTile(tx, ty) ~= 0 and pixY < 0x1B0 then
                value = 1
            end

            for _, sp in ipairs(sprites) do
                if math.abs(sp.x - pixX) <= 8
                and math.floor(sp.y / CP) == ty then
                    value = -1
                    break
                end
            end

            table.insert(inputs, value)
        end
    end

    -- Mario occupies the center cell, so don't feed his own body back in as terrain.
    inputs[(CENTER - 1) * GS + CENTER] = 0
    return inputs
end

local function drawSensorGrid(inputs)
    local ox, oy = 0, 0

    for r = 1, GS do
        for c = 1, GS do
            local value = inputs[(r - 1) * GS + c]
            local x1    = ox + (c - 1) * CELL
            local y1    = oy + (r - 1) * CELL
            local x2    = x1 + CELL - 1
            local y2    = y1 + CELL - 1

            local fill
            if value == 1 then
                fill = 0xFF607dFF -- Collision
            elseif value == -1 then
                fill = 0xFFc0392b -- Enemy
            else
                fill = 0x44c8dff5 -- Empty
            end

            gui.drawBox(x1, y1, x2, y2, 0x88000000, fill)
        end
    end

    local mc = ox + (CENTER - 1) * CELL
    local mr = oy + (CENTER - 1) * CELL
    gui.drawBox(mc, mr, mc + CELL - 1, mr + CELL - 1, 0xFFf39c12, 0xFFf39c12)
end

local function runEpisode(buttonsFn)
    loadStart()
    local startX      = readState().marioX
    local maxX        = startX
    local stuckFrames = 0
    local deathFrames = 0

    for frame = 1, MAX_FRAMES do
        local st = readState()

        if st.marioX > maxX then
            maxX = st.marioX
            stuckFrames = 0
        else
            stuckFrames = stuckFrames + 1
        end

        if st.isDead then
            deathFrames = deathFrames + 1
            if deathFrames >= 3 then break end
        else
            deathFrames = 0
        end

        if stuckFrames >= STUCK_TIMEOUT then break end

        gui.clearGraphics()
        gui.cleartext()

        local inputs = buildSensorGrid()
        local buttons = buttonsFn(st)
        joypad.set(buttons, 1)

        drawHud(st, frame, maxX, startX, stuckFrames)
        drawSensorGrid(inputs)

        emu.frameadvance()
    end

    return maxX - startX
end

local function evaluateStrategy(buttonsFn, numTrials)
    numTrials = numTrials or 3
    local total = 0
    for i = 1, numTrials do
        local result = runEpisode(buttonsFn)
        print(string.format("  Run %d: %d pixels", i, result))
        total = total + result
    end
    return total / numTrials
end

local function sprintRight(_state)
    return { Right=true, B=true }  -- hold Right and B (run) every frame
end

local avgFit = evaluateStrategy(sprintRight, 3)
print(string.format("Average fitness: %.1f pixels", avgFit))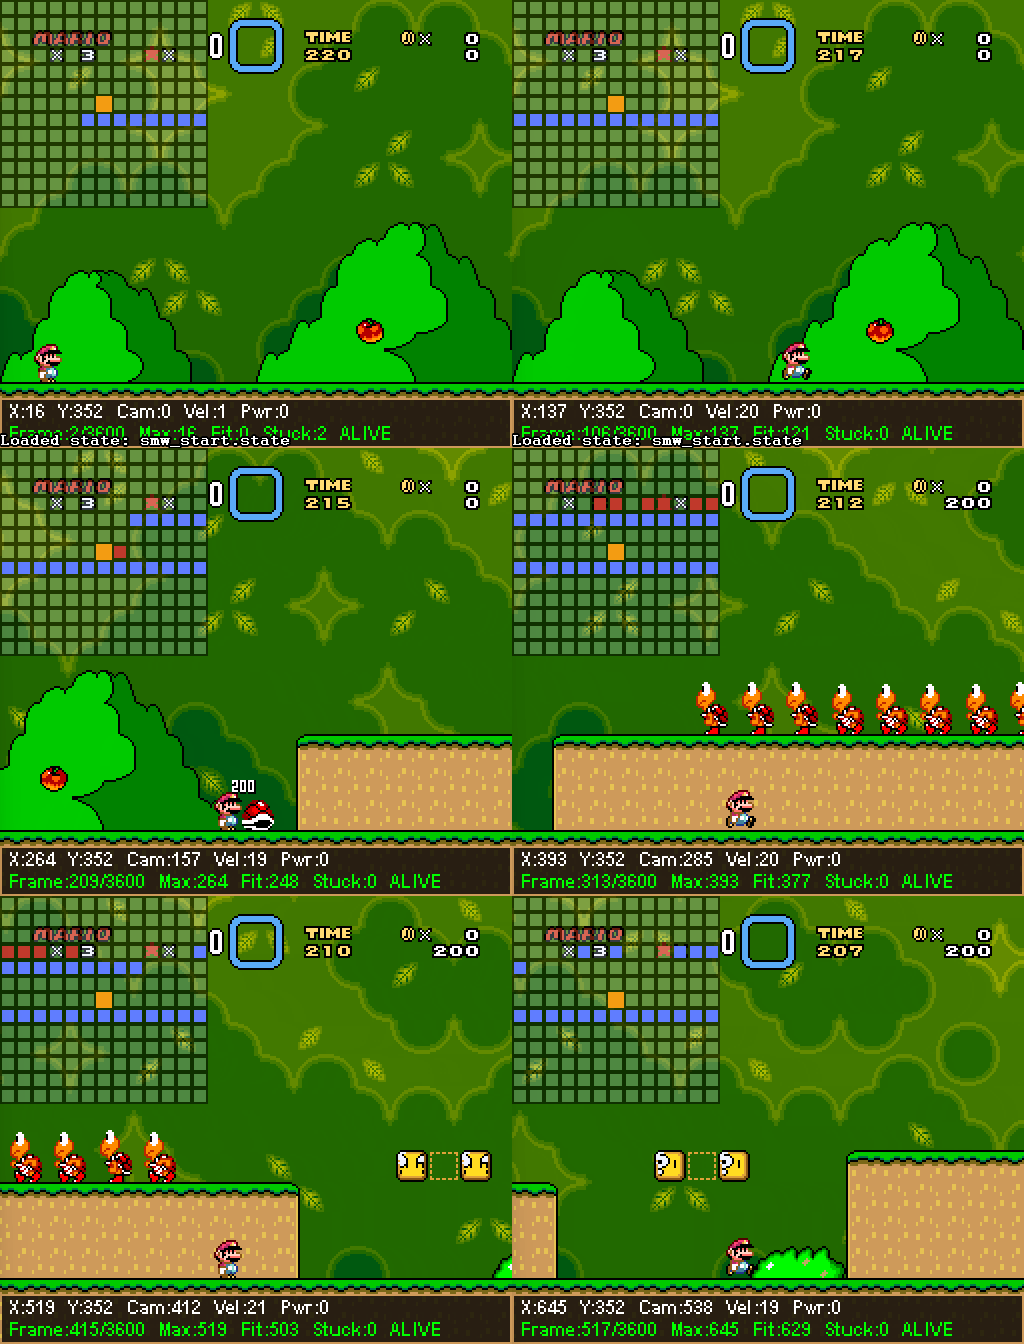
What to Expect
After the final refresh, Mario should walk right three times like he did in Part 2. The difference is that you’ll now see the sensor grid updating during each episode.
Look for these signals:
- blue cells for floor, walls, and pipes
- clear cells for empty space
- red cells when enemies enter the local area
- the orange center cell staying fixed on Mario
Once that matches what you see in the level, you have the exact 169-value input vector Part 4 will feed into the neural network.
Next Up
In Part 4 we’ll build the neural network itself: define the network structure, walk through the forward pass, and map those 169 sensor values to the 8 button outputs that control Mario.
As you run Mario around and watch the sensor grid update, what edge cases or blind spots do you notice that the current mapping might still miss?